此感應器偵測環境(週遭)光源,藉由資料線,可以傳送邏輯訊號來表示現在的光量是否大小於觸發值.
This sensor detects ambient (surrounding) light. Using data wires, it can send out the current light value and a logic signal (true/false) based on whether the current light value falls above or below a trigger point.
觸發點是指一個讓某種情況發生的特定數值,例如,當機器人只有在光量超過60%前進,那麼觸發值就應該設為60.
A trigger point is the specific value in a range of numbers where a change in condition occurs. For example, you might program your robot to move forward only when the light level rises above 60%. The trigger point would be 60.
使用滑桿或是鍵盤輸入觸發值,並須指定感應器的偵測範圍(觸發值以上或是以下).可用單選按鍵或是下拉式選單選擇,範圍內的數值會發送"真"值訊號,而真值範圍的滑桿為彩色,則偽值範圍的滑桿為灰色.
Specify the trigger point by using the slider or by typing a number into the input box. To specify the range (above or below the trigger point) that will generate the “true” signal, use the radio buttons or the pull-down menu. The “true” portion of the range will be in color; the “false” portion will be gray.
預設值為光量超過50%時會產生"真"值訊號,滑桿兩側的單選按鍵是觸發值以上或以下範圍(真值)的設定.
The default setting for the light sensor block is for light levels above 50% to generate a “true” signal. The radio button to the right of the range is selected and the slider is set at 50. To switch the “true” portions of the range (setting values below 50% as “true”), you would select the left radio button.
參數面板的回饋區顯示現在讀取到的光量數據(請先確定感應器連接到指定的輸入端並操作正常).
The feedback box in the configuration panel shows the current light value. (To receive feedback, make sure that the light sensor is connected to the chosen port and that communication has been established with the NXT.)
至少必須使用一條輸出資料線來傳遞數據到其他的指令.
You must drag at least one output data wire from this block’s data hub to another block for any information to be sent. (See the Data Hub section below for more information.)
![]() 小技巧: 如何設定光源感應器的觸發值.
小技巧: 如何設定光源感應器的觸發值.
Tip: How do I set the Trigger Point for a Light Sensor?
如果需要當手電筒照射機器人而產生"真"值時,試著將手電筒照向機器人並觀察回饋區的數據.如果數據在80%左右,則觸發值可以設定70%.那麼當光量大於70%時(像是手電筒照射)就會產生"真"值.如果少於這個光量就會不作用.
If you want a flashlight pointed at your robot to generate the “true” signal, try pointing a flashlight at your robot a few times and watching the light values displayed in the feedback box. If the flashlight generates light levels of around 80%, you might set the trigger value at 70. That way, bright light above 70% (like from the flashlight) will generate a “true” signal. Weaker light will be ignored.
可使用資料線來動態輸入觸發值.
The trigger point can also be set dynamically with an input data wire.
偵測感應器本身所發出的光源
Detecting the Light Sensor’s own Reflected Light
如果勾選"產生光源"的選項,那麼光源感應器會打開本身的光源並偵測到反射回來的光線.這項功能在某些很亮的場合相當有用.也可以用來當做近距離搜尋的照明."產生光源"開啟後,當感應器接近高反射物體時,可以得到更高的反射光量值.那麼就可以用來作為避碰的感應器.
If you check the “Generate Light” checkbox, the light sensor will turn on its own small light source and detect this light if it is reflected back to it. This function is especially useful in difficult lighting conditions like very bright rooms. The function also allows the light sensor to serve as a short-distance range finder. With “Generate Light” turned on, a light sensor approaching a reflective object will detect higher reflected light levels. Therefore, it is possible to use the sensor to avoid running into obstacles.
顯示設定
Display Settings
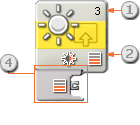
- 顯示光源感應器所連接的NXT輸入端,視需要更改.
The number shows which of your NXT’s ports are connected to the light sensor. You can change this number in the configuration panel if you need to. - 此圖樣顯示觸發值的光量,越多格數表示觸發值越高.
This icon indicates at what level the trigger point is set. The more colored bars displayed, the higher the trigger point. - 此圖樣表示"產生光源"是否打開.
This icon is displayed if “Generate Light” is turned on. - 當指令放在工作區時,資料集線器會自動打開.至少必須使用一條輸出資料線來傳遞數據到其他的指令.(參閱下方的資料集線器資訊)
The block’s data hub will open automatically when the block is placed in the work area. At least one data wire must be dragged from the block’s output plug to another block’s data hub. (See the Data Hub section below for more information.)
設定光源感應器指令
Configuring the Light Sensor Block
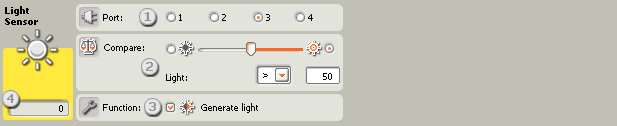
- 選擇光源感應器連接的輸入端.預設值為輸入端3,依需要改變.
Choose the port where your light sensor is plugged in. By default, the block will be set to port 3 for a light sensor. You can change this selection if you need to. - 滑桿的功用在於設定觸發光量值或是直接輸入數字.如果點選滑桿右邊的單選按鈕,則會在超過觸發值時觸發指令,如果點選滑桿左邊的單選按鈕,則會在低於觸發值時觸發.也可以使用下拉式選單來設定"真"值區域.
Use the slider to set the trigger value or type a value directly into the input box. Select the radio button to the right of the slider if you want the block to be triggered by light levels higher than the trigger value; select the left radio button to trigger the block with light levels lower than the trigger value. You can also use the pull-down menu to set the “true” portion of the slider. - 如果勾選"產生光源"的選項,那麼光源感應器會打開本身的光源並偵測到反射回來的光線.
If you check the “Generate Light” checkbox, the light sensor will turn on its own small light source and detect this light if it is reflected back to it. - 回饋區顯示當時偵測到的光量值(0-100%).可用來決定不同的觸發值.
The feedback box displays the current light reading (0-100%). You can use it to try out different trigger values.
設定光源感應器的資料集線器
Configuring the Light Sensor block’s Data Hub
用資料線可以任意地用來控制光源感應器指令.(從其他指令的資料集線器到光源感應器指令的資料集線器).
You can control the Light Sensor block dynamically by connecting data wires (from other blocks’ data hubs) to the Light Sensor block’s data hub.
把指令放在工作區上後,可以按圖示的左下角來打開資料集線器.
Open a block’s data hub by clicking the tab at the lower left edge of the block after it has been placed on the work area.

連接到集線器左邊連接埠的資料線是屬於負責傳遞資料進入指令中,而要從指令送出資料時,則須從集線器的右邊連接埠連接資料線.
Data wires carrying input information to a block are connected to the plugs on the left side of its data hub. Data wires carrying output information are connected to the plugs on the right side.

[A]輸入連接埠 [A] Input plug
[B]輸出連結部 [B] Output plug
[C]數字資料線(黃) [C] Number data wire (yellow)
[D]邏輯資料線(綠) [D]Logic data wire (green)
[E]文字資料線(橘) [E]Text data wire (orange)
[F]無效資料線(灰) [F]Broken data wire (gray)
資料由輸入端傳至傳出端
Passing data from the input plug to the output plug
如果輸入連接埠有對應的輸出連接埠(請參閱 A 以上)時,那麼輸入的資料就會原封不動地傳遞到輸出連接埠.在這樣的情況下, 如果輸入連接埠連著資料線,那麼就只能使用輸出連結埠來做連結. 也就是說,當連結輸出連接線到這樣的輸出連接埠,而不透過相對應的輸入資料線時,就會讓該輸出連接線呈現無效的狀態.
If an input plug has a corresponding output plug (see A above), the input data will pass through from the input plug to the output plug without being changed. In this case, you can only use the output plug if the input plug is connected to an input data wire; connecting an output data wire to such an output plug without a connected input data wire will cause the output data wire to be “broken” (and colored gray).
特定的資料型態
Data wires carry specific types of data
每條資料線都負責傳送特定資料.例如,一條從邏輯連接埠拉出的資料線則只能連結到另一個同屬邏輯連接埠的集線器上.
Each data wire carries a specific type of data between blocks. For example, if a data wire is dragged from a logic plug on a block’s data hub, it can only be connected to a logic plug on another block’s data hub. The chart below shows what kind of data each plug can accept or send out.
資料線顏色
Data wire colors
資料線依照特定的顏色作識別:黃色資料線傳送數值資料、綠色資料線傳送邏輯資料(真/偽)及橘色資料線傳送文字資料
Data wires are identified with specific colors: wires carrying number data are colored yellow, wires carrying logic data are colored green, and wires carrying text data are colored orange.
無效的資料線
“Broken” data wires
如果資料線連結到錯誤資料型態的連接埠時,則該資料線會呈現斷線無效狀態並以灰色表示.而有無效的資料線存在就無法下載程式.
If you try to connect a data wire to a plug of the wrong data type, the data wire will be broken (and colored gray). You will not be able to download your program if a data wire is broken.
點選無效的資料線時,在工作區右下方的幫助視窗中會看到無效的原因.
If you click a broken wire you can read why it is broken in the small help window in the lower right corner of the work area.
資料必須在連接埠的限制範圍內
DData must be within the possible range of the plug
如果資料線傳輸該連接埠資料範圍之外的資料時,該指令不是忽略資料就是轉成合理範圍內的資料.對那些只能接收少量輸入值的連接埠來說(例如,0,1,或2),該連結埠就會忽略超出範圍的數值.
If an input data wire transmits a value outside the possible range of the plug it is connected to, the block will either ignore the value or change it to a value within its range. For plugs that allow just a few input values (example: just 0, 1, or 2), the plug will ignore the input if a value arrives outside its range.
而對那些可以接收大量範圍輸入值(例如: 0~100)的連接埠來說,該連接埠就會將數值轉成可接受的範圍. 例如, 移動指令的動力連接埠接收到150的輸入值時,那麼移動指令就會轉成100(也就是動力連接埠的範圍內).
For plugs that accept larger input ranges (example: 0 – 100), the plug will force any input outside its range to fit. For example, if a Move block’s Power plug receives an input value of 150, the block will change the input value to 100 (i.e., a number within the Power plug’s range).
下表列出本資料集線器中各連接埠的特性
This chart shows the different characteristics of the plugs on the Light Sensor block’s data hub:
| 連接埠 Plug |
資料型態 Data Type |
資料範圍 Possible Range |
資料意義 What the Values Mean |
連接埠例外說明 This Plug is Ignored When... |
|
| 輸入端 Port |
數字 Number |
1 - 4 | 1 = 輸入端1, 2 = 輸入端2, , 3 = 輸入端3, 4 = 輸入端4 1 = Port 1, 2 = Port 2, 3 = Port 3, 4 = Port 4 |
||
| 觸發值 Trigger Point |
數字 Number |
0 - 100 | 用來比較的數值 Value to compare against |
||
| 大於 / 小於 Greater / Less |
邏輯 Logic |
真/偽 True/False |
比較方式: 真 = 大於, 偽 = 小於 Logic used in comparison. True = Greater, False = Less |
||
| 產生光源 Generate Light |
邏輯 Logic |
真/偽 True/False |
是否打開自身LED燈 Determines if the sensor's own LED is on or not |
||
| 是 / 否 Yes / No |
邏輯 Logic |
真/偽 True/False |
比較結果 Result of comparison |
||
| 強度 Intensity |
數字 Number |
0 - 100 | 感應器讀到的數值(已轉換) Scaled value read from sensor. |
||
| 原始數據 Raw Value |
數字 Number |
0 - 1024 | 感應器讀到的原始數值(未轉換) Raw (unscaled) value read from sensor |